Building Hassle-Free Frontends in AWS: A Technical Exploration
6 min read


Production-ready applications are complicated. All the wonderful tooling that has been produced in the past few decades has given developers a significant amount of power to make highly scalable and secure websites, but this has come at the cost of having millions of different ways to host a website.
The goal of this blog post is to set you up with great defaults for production-grade websites that you can grow with and extend.
At Transcend, we’ve found that using open-source Terraform modules provides both easy setup and maintainability. By leveraging the work of others, we are highly confident in the scalability and security of our websites.
So if you have a website, a domain name, and AWS credentials, let’s get started!
Before we start - a crash course on modern frontends
How do you want caching to work on your website? Will the caching differ for HTML and JavaScript files? What TLS versions do you want to support? Do you want to use gzip compression? What CORS options do you want? Do you want to support IPv6?
These questions can feel overwhelming, but are almost all necessary to think about when building a modern, production-grade site. With a wide ecosystem of AWS-managed services related to frontends, and hundreds of CI/CD options for creating the infrastructure and application code necessary for a website, finding a good starting ground can be challenging. It’s no surprise that there are a number of successful companies who specialize in connecting version control repositories to black-box infrastructure of their own. Navigating all of this on your own can feel more than a little daunting.
Even with the wonderful set of AWS-managed services, you are still responsible for:
- Setting up an S3 bucket to host your application code
- Setting up a CloudFront distribution to act as a content delivery network (CDN) for the files in your S3 bucket
- Using CloudFront origin access identity to protect your S3 contents from sources outside of your CDN
- Creating an SSL/TLS certificate using the AWS Certificate Manager (ACM)
- Pointing your domain names to your CloudFront distribution using Route53
- Answering all of the questions posed above, as well as many others left out for brevity’s sake
Even if you’ve gone through this process dozens of times, it takes over an hour of focused work if being done manually, and is error-prone. If you have multiple environments like dev, staging, and prod, you need to duplicate your work over and over again in the console.
A more modern approach is to use Infrastructure as Code (IaC) tools to automate the process of setting up AWS infrastructure. These tools, such as Terraform, Pulumi, and CloudFormation let you declare your desired cloud state in config files (or code in Pulumi’s case), and then the tool takes over and makes sure that the infrastructure in your AWS account matches what you described.
All of these tools have their merits, but this post will focus on using Terraform because:
- It leverages a powerful and plain config language (HCL)
- It has a module registry with hundreds of best-practice modules
- It is open-source, yet is also backed by a proven company in HashiCorp
- It can manage resources in multiple clouds and services (AWS, Google Cloud, Slack, GitHub, etc.)
The best hosting-as-a-service companies simplify all these complicated steps with a set of forms letting you customize your site. Terraform follows this same process, except your customizations are encoded in a config file instead of a web UI.
With that out of the way, let’s create some infrastructure!
Example repo
For this project, we will use a folder structure like this.
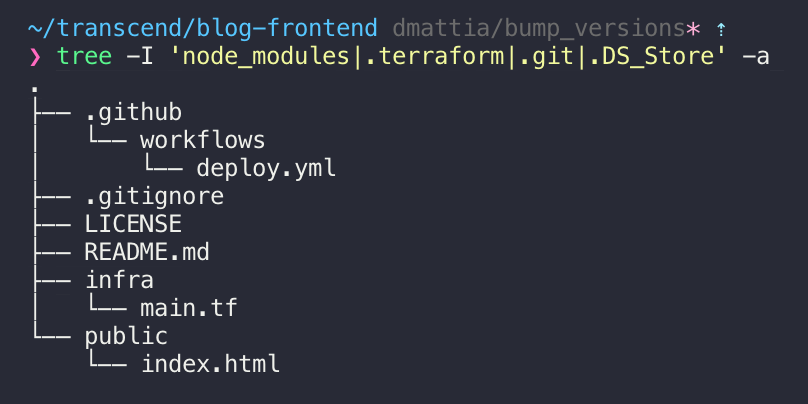
A complete example repository is available here, a complete CI/CD run from scratch is available here, and the example site created from this tutorial can be found here.
Step 1: Write some Terraform

Some cloudy infrastructure as we build our cloud infrastructure. (Unsplash: Thomas Ciszewski)
Let’s get started by getting set up with Terraform (we’ll assume you’ve gotten through the above section).
We have a long list of questions to answer regarding how our frontend should work, so let’s put some sensible defaults into a config file.
First let’s create a file called main.tf and declare that we want to use the AWS provider (which establishes the credentials we want to use to create resources) and remote state (which keeps track of which resources in the configuration have already been created):
provider "aws" {
  version = "~> 2.0"
  region  = "us-east-1"
}


terraform {
  backend "remote" {
    hostname     = "app.terraform.io"
    organization = "transcend-io"


    workspaces {
      name = "blog-frontend"
    }
  }
}
This boilerplate should look familiar if you’ve used Terraform before, and is just one example of how to use state, but any configuration setup should work just fine. If you’d like to remove this boilerplate from your code altogether, check out our post on advanced Terraform automation with Terragrunt.
Now for the fun part—let’s make some resources using open-sourced modules.
Second, let’s create an SSL/TLS certificate with AWS Certificate Manager. In main.tf, add:
locals {
  domain = "acme-example.com"
}


module "acm_request_certificate" {
  source                      = "cloudposse/acm-request-certificate/aws"
  version                     = "0.7.0"
  domain_name                 = local.domain
  wait_for_certificate_issued = true
}
This module fully manages creation of an ACM certificate for you. It will create a certificate, add DNS validation, and then wait for the certificate to fully validate. Once this validation is complete, the certificate will be automatically renewed using the DNS validation as it gets close to expiring.
Those 10 lines of code above let you completely forget about managing SSL/TLS once they are written.
Finally, let’s answer all of the questions from the top of this post. In main.tf, add
data "aws_route53_zone" "zone" {
  name = local.domain
}


module "cloudfront-s3-cdn" {
  source  = "cloudposse/cloudfront-s3-cdn/aws"
  version = "0.34.1"


  name               = "acme-example"
  encryption_enabled = true


  # DNS Settings
  parent_zone_id      = data.aws_route53_zone.zone.id
  acm_certificate_arn = module.acm_request_certificate.arn
  aliases             = [local.domain]
  ipv6_enabled        = true


  # Caching Settings
  default_ttl = 300
  compress    = true


  # Website settings
  website_enabled = true
  index_document  = "index.html" # absolute path in the S3 bucket
  error_document  = "index.html" # absolute path in the S3 bucket


  depends_on = [module.acm_request_certificate]
}


output s3_bucket {
  description = "Name of the S3 origin bucket"
  value       = module.cloudfront-s3-cdn.s3_bucket
}
In this basic setup, we’ve pointed acme-example.com to our CloudFront distribution with IPv6 support, set up some sane caching, enabled gzip, enabled encryption at rest for our S3 bucket, and enabled encryption in transit with our SSL/TLS certificate. We’ve also added an output for the name of the created S3 origin bucket so that we can upload to it in our CI pipeline later.
And that’s it! With these quick lines, we have a configuration setup for a production-ready site. If you want to customize the infrastructure further, just check out the over 60 options available on the Cloudposse module.
Step 2: Connect it with CI/CD

Amazon excels at continuously delivering packages, now you can too.
Wow, that config file sure is pretty. Wouldn’t it be nice if the infrastructure it described actually existed? We could go down the route of explaining how to install Terraform, run a plan and apply, etc. Or I could show how to have a CI/CD system that applies the infrastructure for you, ensuring that your AWS infra always stays up to date with your Terraform code.
I like the CI/CD approach, as it reduces the cognitive load on newer team members and provides some added security confidence by helping ensure your code exactly describes your real-world infra.
In 2020 we are blessed with dozens of robust CI/CD tools, but for the purposes of this post I will use GitHub Actions because it’s very quick to set up. The steps here are quite simple, so porting the commands to any other platform should be relatively easy.
To create a new GitHub Action workflow, add a file named deploy.yml under your repo’s .github/workflows directory with the contents:
name: Update Infrastructure and deploy application code


on:
  push:
    branches:
    - master


jobs:
  deploy:
    runs-on: ubuntu-latest
    defaults:
      run:
        working-directory: infra
    steps:
    # Checkout this repo
    - uses: actions/checkout@v2


    # Download a specific Terraform version you'd like to use
    - uses: hashicorp/setup-terraform@v1
      with:
        terraform_version: 0.13.2
        cli_config_credentials_token: ${{ secrets.TF_API_TOKEN }}
        terraform_wrapper: false


    # Ensure you have AWS credentials set up. Your config will likely differ here
    - name: Configure AWS Credentials
      uses: aws-actions/configure-aws-credentials@v1
      with:
        aws-access-key-id: ${{ secrets.AWS_ACCESS_KEY_ID }}
        aws-secret-access-key: ${{ secrets.AWS_SECRET_ACCESS_KEY }}
        role-to-assume: ${{ secrets.AWS_ROLE_TO_ASSUME }}
        role-skip-session-tagging: true
        role-duration-seconds: 1200
        aws-region: us-east-1


    # Apply the Terraform code
    - run: terraform init
    - run: terraform validate
    - run: terraform plan -out planfile
    - run: terraform apply planfile


    # Upload our website code to our origin S3 bucket
    - name: Deploy static site to S3 bucket
      run: aws s3 sync ../public s3://$(terraform output s3_bucket) --delete
Note: you have to add your secret environment variables to GitHub. Here’s how to do that.
And with 44 lines of configuration code, we have a complete CI/CD pipeline that keeps both our infrastructure and application code up to date! Not only that, but the GitHub Actions UI will act as an audit log of any infrastructure changes that are made, so if your website ever experiences problems you can view the output of the exact Terraform commands that most recently changed your infra.
With no pre-existing infrastructure other than a hosted zone for the domain acme-example.com, this action was able to fully create the desired infrastructure and upload a sample website in about 5 minutes: https://github.com/transcend-io/blog-frontend/runs/1123713019
Summing up
Your config files should be just as easy to use as modern platform-as-a-service offerings. With Terraform and GitHub Actions, this dream becomes a reality.
In around 100 lines of code, we can codify an entire frontend with a working CI/CD pipeline for both infrastructure and application code. It’s all just config: there are no fancy loops, terse functions, or anything else that could cause confusion for newer developers. Once you’ve learned how to use one Terraform module, you can use any other module with minimal deep thinking involved.
The best part is that this config is highly copy-pastable. Do you want to build a different website, that is similar but with different caching options? Copy over the Terraform, change the domain name local value, update the caching configuration, and you’re done. Because the GitHub Action code uses Terraform outputs, you can actually just copy over that file exactly as is with no changes at all.
Hopefully this blog serves as a good starting point. While the end result does not have all the customizations possible for a modern frontend site, it is highly scalable, auditable, and can be easily extended in the future for when you need to add functionality.


By David Mattia