BeyondCorp: Restricting Access to Internal Websites Securely
10 min read


Internal websites. Every company has them, and they often contain some of your company’s most important data. So you should protect them to protect that data.
This isn’t a new idea, as companies have been creating VPNs (virtual private networks) to restrict access to their internal networks for decades. But once Google became wary of this approach in 2009 after the Operation Aurora hack attempt, they decided to shift towards a zero-trust security model, where every request is treated as though it is coming from a network that could be compromised.
This gave birth to BeyondCorp, a theoretical model for protecting all of your applications without the use of a VPN.
This idea has been widely praised by security researchers, though practical guides on getting started with it on the most popular cloud platforms are still limited. This is despite the fact that Google’s whitepaper explaining the idea was released in 2014.
We get it, BeyondCorp is complex. It asks you to look at every single request flowing through your system and to validate it’s legitimacy based on multiple data sources: where is the request coming from, who is sending it, what is the security status of that source, etc. That’s a lot to ask!
But we also believe that getting started with BeyondCorp is much easier than many may think, and that the security payoffs can come immediately.
This blog post aims to provide a practical implementation guide for using BeyondCorp security on your internal websites hosted in AWS.
At Transcend, we use BeyondCorp security to ensure our IP and our users’ data stays safe.
Enough buzz words. What would this look like as a user?
BeyondCorp is filled with buzz words. It’s zero trust. It’s perimeter-less. It’s context-aware. That sure is a lot of cool phrases. But what does it look like in real life? Well, let’s see what happens when I go to Transcend’s internal codelabs site, where we have set up BeyondCorp authentication with our company’s GSuite credentials:
When I attempt to load the site, it asks me to login with my GSuite credentials. Note that this includes a hardware MFA token requirement that is easily enforceable across an entire GSuite organization (and many other identity providers). Once I gain access to the site, I won’t need to log in to any internal systems for an hour.
To see for yourself, head on over to codelabs.dev.trancsend.com. While the DNS is public, only our internal employees can gain access to our internal tutorials, and you won’t be allowed in unless you have an @transcend.io email address.
Side note: You can check out some of our publicly facing tutorials at codelabs.transcend.io
How is this better than a VPN?
VPNs create “eggshell” security, where all protections happen at the perimeter. Once access is gained into a system, all the data inside that network is accessible. And with the rise of remote work, cell phones, and other mobile devices, your “secure” network of trusted devices is becoming wider all the time.
In contrast, BeyondCorp encourages consistent authentication throughout all parts of an application for all devices. It doesn’t matter what device attempts to access codelabs.dev.trancsend.com, even our CEO’s laptop will need to authenticate securely before viewing the site’s contents.
VPNs are an extra attack vector. When a pentester or hacker attempts to attack your network, one very common approach is to search for vulnerabilities in any public-facing server of yours they can find. Oftentimes, systems like VPN access points are a primary target. Here’s a story where a bug bounty hunter attacked Facebook using this approach. When he gained access to one of their internal servers, he noticed leftover files from another pentester who had used the same vulnerability to steal a small number of internal credentials.
Exploits related to CVEs (common vulnerabilities and exposures) on VPN servers are all too common, such as the time that 900+ enterprise VPN servers had their passwords dumped, or when a commonly used VPN implementation allowed for direct access to I/O devices. Or the time that Lockheed Martin who (despite a solid effort to include MFA on their VPN) was still attacked by a group who had found the random seeds used to generate tokens on their hardware MFA tokens.
And if you use your company’s WiFi network as a trusted network, that network can become an attack vector as well. In 2016, the KRACK vulnerability in WPA2 allowed attackers to find the encryption keys for all network traffic flowing through a router.
These hacks are not theoretical. They are directed and well-coordinated. When your company is successful, someone will want your data.
In contrast, BeyondCorp has no VPN. Instead of having a public-facing service that gives access to internal, hidden sites, BeyondCorp has public-facing services that request authentication information from an internal, hidden authentication server. Because this authentication server is not exposed, it is much harder to attack.
VPNs offer no guarantees over security within your network
While your internal service #9001 may have a firewall rule saying that only server #4001 can talk to it on port 443, how does service #9001 know that the request on #4001 was not sent by an adversary who got through the VPN security?
It doesn’t in traditional architectures.
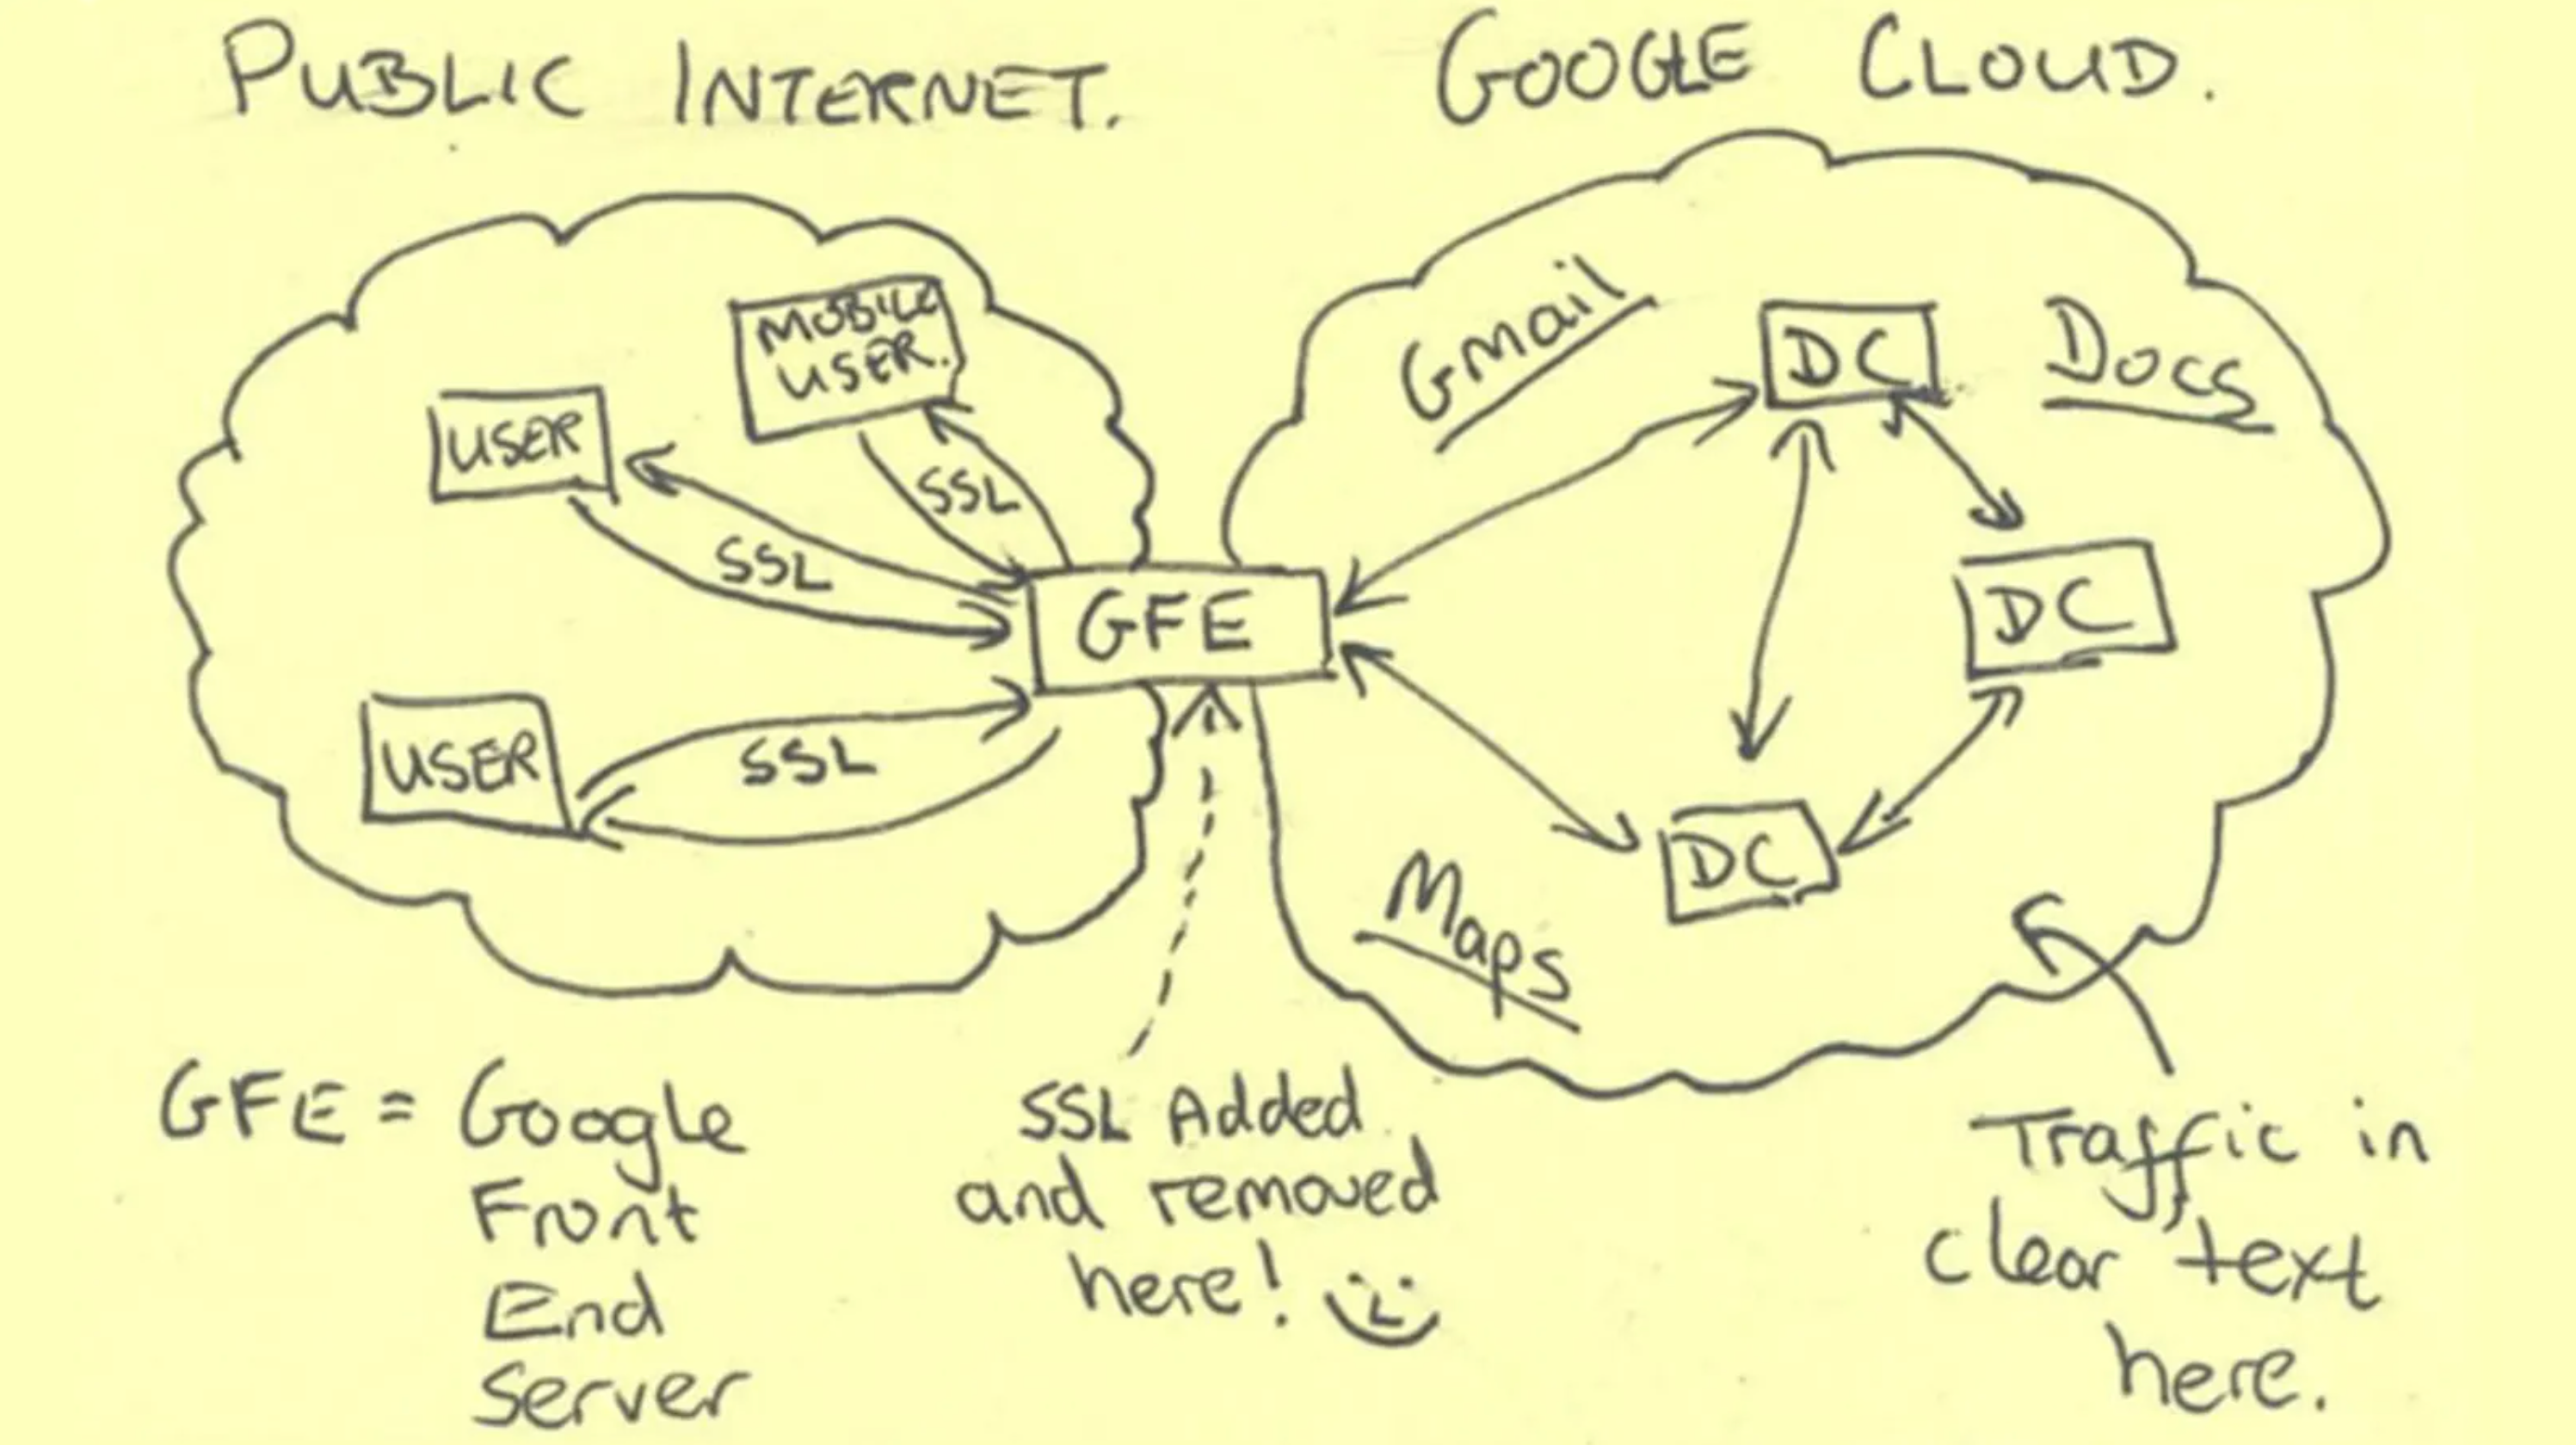
In Edward Snowden’s document dump to the Washington Post in 2013, we got to see the picture above. In it, the NSA shows (with a smiley face) that traffic inside Google’s cloud did not use encryption on requests, as they saw the network perimeter as secure.
In this case, the NSA didn’t even need to break into the perimeter. Their MUSCULAR program went directly to the network infrastructure that connected Google’s (and Yahoo’s) data centers, siphoning off so much data from the fiber optic cables that the NSA’s PINWALE database was overwhelmed.
This attack was painfully simple. In today’s world of cloud everything, it’s important to remember that the VPN that protects your network physically exists somewhere, and that the cables that your network traffic flows through exist physically somewhere. Attackers are smart, and will make use of all vectors at their disposal.
In contrast, BeyondCorp authenticates all requests, even those inside your private networks. Services like AWS App Mesh will soon require that Proxy Authorization is used for all internal requests. This requirement, as well as the increased ease of using TLS everywhere on service meshes, makes it far easier to enforce encryption and security for your network traffic.
Where do we start?
AWS has a few services that make implementing BeyondCorp quite manageable. If you’re getting nervous and thinking that adding application code to every single frontend and backend in your company sounds like a lot of work, have no fear—Amazon Cognito is here!
Amazon Cognito is a managed service for authentication management. It connects with many identity providers, like Google, Facebook, and Apple, while also supporting generic providers through SAML and OpenID Connect.
If you aren’t familiar with these authentication protocols, just know that it means that in the Codelabs demo from earlier, you can change the GSuite login to be login through Okta, Amazon accounts, your company’s custom auth, etc.
Cognito is a great fit for introducing BeyondCorp because it lives at the infrastructure level, and can be easily added to individual services. This makes adding BeyondCorp incrementally easy, and also means that you don’t need to make any application code changes. If you have polyglot apps written in a variety of languages and frameworks, you’re in luck: Cognito works the same way for all of them.
Creating a Cognito User Group
The first step of this process is to create a group of people who can access your resources. With Cognito, each different group of people that should have access to a different set of resources can be made into a User Pool.
To create a User Pool with Terraform, we can write:
resource "aws_cognito_user_pool" "pool" {
  name = "codelab-user-pool"
}
The next step is to create a User Pool App Client, which is what controls the settings for how users can authenticate to the User Pool:
locals {
  domain         = "codelabs.dev.trancsend.com"
  backend_alias  = "beyondcorp-alb.${local.domain}"
  frontend_alias = "beyondcorp-cloudfront.${local.domain}"
}


resource "aws_cognito_user_pool_client" "client" {
  name                = "codelab-user-pool-client"
  user_pool_id        = aws_cognito_user_pool.pool.id
  generate_secret     = true
  allowed_oauth_flows = ["code"]
  callback_urls = [
    "https://${local.backend_alias}/oauth2/idpresponse",
    "https://${local.frontend_alias}",
  ]
  allowed_oauth_scopes                 = ["email", "openid"]
  allowed_oauth_flows_user_pool_client = true
  supported_identity_providers         = ["COGNITO"]
  explicit_auth_flows = [
    "ALLOW_CUSTOM_AUTH",
    "ALLOW_REFRESH_TOKEN_AUTH",
    "ALLOW_USER_SRP_AUTH",
  ]
}
In this example, we have not enabled an Identity Provider (IdP), so only username and password auth is accepted. If you want to enable an IdP like GSuite, you can add additional Cognito Identity Providers quite easily.
To finalize our setup, let’s create a domain. This hosted UI for authentication needs to exist at some URL on the web, and Amazon lets you easily specify where you want your login page to live (either under the amazoncognito.com domain or on your own custom domain). In this example, let’s make a subdomain for our login site at https://codelab-beyondcorp-alb.auth.us-east-1.amazoncognito.com/:
resource "aws_cognito_user_pool_domain" "domain" {
  domain       = "codelab-beyondcorp-alb"
  user_pool_id = aws_cognito_user_pool.pool.id
}
Securing a backend
Now that we have a Cognito User Group, we can connect it to our backend applications. It’s relatively common for most backend routes to already have some sort of authentication, so you only need to add Cognito to those that don’t.
AWS Application Load Balancers give this sort of fine grained control. In this section, we will build a complete application with a public route and a private route (requiring login through the Cognito User Pool from the last section), all in around 100 lines of Terraform! First, let’s create a Virtual Private Cloud (VPC) to put the load balancer in. In most of your applications, you would also have to add private subnets for your EC2s, ECS services, Auto Scaling groups, databases, etc.
provider "aws" {
  version = "~> 3.0"
  region  = "us-east-1"
}


module "vpc" {
  source  = "terraform-aws-modules/vpc/aws"
  version = "~> 2.18.0"


  name = "codelab-vpc"
  cidr = "10.0.0.0/16"
  azs  = ["us-east-1a", "us-east-1b"]


  # For the load balancer
  public_subnets = ["10.0.201.0/24", "10.0.202.0/24"]
}
Now, let’s add in resources for an SSL certificate through the Amazon Certificate Manager (ACM). This SSL cert will be used for our frontend and backend:
data "aws_route53_zone" "this" {
  name = local.domain
}


module "acm" {
  source  = "terraform-aws-modules/acm/aws"
  version = "~> 2.0"


  zone_id                   = data.aws_route53_zone.this.id
  domain_name               = local.domain
  subject_alternative_names = [
    local.backend_alias,
    local.frontend_alias,
  ]
}
To keep our app secure, we only want to talk to our ALB on port 443 (HTTPS), so we can make this explicit with a security group:
module "security_group" {
  source  = "terraform-aws-modules/security-group/aws"
  version = "~> 3.0"


  name   = "alb-codelab"
  vpc_id = module.vpc.vpc_id


  ingress_cidr_blocks = ["0.0.0.0/0"]
  ingress_rules       = ["https-443-tcp"]
  egress_rules        = ["all-all"]
}
Now for the fun part—let’s create an application! AWS offers many ways to create backend applications: ECS, EKS, EC2s, Lambda functions, and more. But all of these have something in common: they are target options of Application Load Balancers (ALBs). By adding authentication at the ALB layer, we can easily add a login step to all of these backend services.
To keep things generic here, I’ll show an ALB that gives fixed responses, but the logic should work the same way regardless of what sits behind the ALB in your situation:
module "alb" {
  source  = "terraform-aws-modules/alb/aws"
  version = "~> 5.9.0"


  name = "beyondcorp-codelab"


  load_balancer_type = "application"


  # Put the ALB in the VPC created above, with only port 443 open
  vpc_id          = module.vpc.vpc_id
  security_groups = [module.security_group.this_security_group_id]
  subnets         = module.vpc.public_subnets


  # Only listen on port 443, using the SSL certificate from above
  https_listeners = [{
    port            = 443
    certificate_arn = module.acm.this_acm_certificate_arn
  }]


  https_listener_rules = [
    # Create a fixed-response for path `/public`
    {
      https_listener_index = 0
      actions = [{
        type         = "fixed-response"
        content_type = "text/plain"
        status_code  = 200
        message_body = "This is a public response"
      }]


      conditions = [{ path_patterns = ["/public"] }]
    },
    # Require authentication for path `/private`
    {
      https_listener_index = 0
      actions = [
        {
          type                = "authenticate-cognito"
          user_pool_arn       = aws_cognito_user_pool.pool.arn
          user_pool_client_id = aws_cognito_user_pool_client.client.id
          user_pool_domain    = aws_cognito_user_pool_domain.domain.domain
        },
        {
          type         = "fixed-response"
          content_type = "text/plain"
          status_code  = 200
          message_body = "This is private response, only accessible with Cognito auth"
        },
      ]


      conditions = [{ path_patterns = ["/private"] }]
    }
  ]


  # In this codelab, we don't register anything to this target group to keep the example simple.
  target_groups = [{
    name             = "beyondcorp-alb"
    backend_port     = 443
    backend_protocol = "HTTPS"
  }]
}
Notice that our application will have two paths: /public and /private. When /public is requested, the text “This is a public response” is returned immediately. When /private is requested, there are two actions: authentication to our User Pool, and then a fixed response (which will only be returned if the authentication step succeeds).
For this exercise, I also added a DNS record pointing to the ALB from this demo so that you can verify the behavior:
module "dns" {
  source          = "git::https://github.com/cloudposse/terraform-aws-route53-alias.git?ref=tags/0.4.0"
  aliases         = [local.backend_alias]
  parent_zone_id  = data.aws_route53_zone.this.id
  target_dns_name = module.alb.this_lb_dns_name
  target_zone_id  = module.alb.this_lb_zone_id
}
After a terraform apply creates our infrastructure, we can try accessing the public url and the private url.
Backend demo
We create a user with a username “testuser” and password “Test123!” in our Cognito User Pool, which can be done in the console like this:
Now, let’s see what happens when we go to the public url.
And what about if we go to the private url? It will make us log in first before we can see the content:

Securing a frontend
First, some background on AWS frontend technologies
Sometimes, you’ll want to add Cognito authentication to your frontends. As an example, maybe you have dev and staging sites that give routes that could affect your development databases. Or maybe you want to limit a site’s access because it’s only created for end-to-end tests and you don’t want outsiders to interfere with the database state. In cases like our codelabs website, we simply don’t think our internal-facing codelabs would be interesting or useful to anyone else (or are still drafting them for external release).
In these cases, it is a good idea to add similar login functionality to your frontends as we just walked through for backends. While you could absolutely have your website be a target from an ALB and use the same Cognito steps as in the backend section, that comes with some drawbacks. By limiting all traffic to a site to come from a load balancer, you lose a lot of the benefits of a globally distributed CDN, and also will need to pay quite a bit more for a long-lived ALB server.
Instead, we can make use of Amazon’s serverless technology, Lambda@Edge. For an introduction on how to make simple frontends in AWS using CloudFront and S3, check out our blog post. For a more advanced look into how to set up and use Lambda@Edge functions, check out our follow up post.
The main idea is that we will have a Lambda function that runs anytime our frontend is requested. This function will give access to the frontend if a user is already logged in, or will redirect them to log in to the Cognito authentication page if they have not already logged in or their session is expired.
Creating infrastructure with Terraform
Now that we have a common understanding of what CloudFront and Lambda@Edge are, let’s use Terraform to make a CloudFront distribution, with an S3 origin, protected by a Lambda@Edge function. And let’s do it in just 45 quick lines!
First up, let’s create a Lambda@Edge function:
module "lambda_at_edge" {
  source = "git::git@github.com:transcend-io/beyondcorp-cloudfront//terraform-module?ref=0.0.3"


  name                         = "codelab_cognito_auth"
  description                  = "Cognito Lambda@Edge for codelabs"
  ssm_client_secret_param_name = "codelab_client_secret"


  userpool_id     = aws_cognito_user_pool.pool.id
  client_id       = aws_cognito_user_pool_client.client.id
  client_secret   = aws_cognito_user_pool_client.client.client_secret
  userpool_region = "us-east-1"
  ui_subdomain    = aws_cognito_user_pool_domain.domain.domain
  scopes          = aws_cognito_user_pool_client.client.allowed_oauth_scopes
}
The exact contents of that function are highly similar to what the built-in functionality in ALBs offers, in that it only will show the frontend contents if authorization succeeds. To see how this module works, or to see the source code of the Lambda function, check out our public repo. One of the coolest parts of this Lambda function is that you can reuse it on multiple CloudFront distributions, as long as the other frontends should allow the same Cognito User Pool to authenticate. Now that our Lambda@Edge function is ready, let’s create a CloudFront distribution with an S3 origin and our SSL certificate we made in the backend section:
module "cloudfront" {
  source = "git::https://github.com/cloudposse/terraform-aws-cloudfront-s3-cdn.git?ref=master"


  # General settings
  namespace          = "codelab-example"
  name               = "cognito"
  comment            = "Example frontend for Cognito auth"
  encryption_enabled = true


  # DNS settings
  aliases             = [local.frontend_alias]
  parent_zone_name    = local.domain
  acm_certificate_arn = module.acm.this_acm_certificate_arn


  # CORS settings
  cors_allowed_origins = ["*"]
  cors_allowed_headers = ["Authorization"]


  # Website settings
  website_enabled = true
  index_document  = "index.html"
  error_document  = "index.html"


  # Lambda@Edge setup
  lambda_function_association = [{
    event_type   = "viewer-request"
    include_body = false
    lambda_arn   = module.lambda_at_edge.arn
  }]
}
And that’s it! If you apply with Terraform, you’ll have a website protected by Cognito authentication. You can publish website contents to the origin S3 bucket in your normal CI/CD pipeline, or any other way you’d like. For a quick example site, I populated an index.html file in the bucket with:
resource "aws_s3_bucket_object" "website" {
  bucket       = module.cloudfront.s3_bucket
  key          = "index.html"
  content      = "<h1>Hidden website</h1>"
  content_type = "text/html"
}
Check out our example, where you can login with username testuser and password Test123!.
Conclusion
That’s all you need! With around 200 lines of terraform, we’ve created a frontend application, backend application, SSL certificate for both apps, and authentication mechanisms that protect both apps. Protecting frontend and backend code has never been easier, and doing so at an infrastructure level enables you to let your apps focus on just what they ought to.
Hopefully these tutorials help you get started with BeyondCorp on some of your own internal services.
P.S: If you’re working on privacy engineering projects, Transcend hosts a virtual meetup every two months. Find out more and register here.
References
Here are some of the many awesome resources I used when researching BeyondCorp and AWS:
- Lambda@Edge module for a variety of auth sources
- BeyondCorp site hosted by Okta
- AWS blog on validating JWTs with Lambda@Edge
- Sample code to decode and validate JWTs in Python and Typescript
- Sample code for validating JWTs from Cognito
- Sample JSON for a Lambda@Edge event from CloudFront
- Accessing cookies in Lambda@Edge
- Why we can only use code oauth flows
- Setting up a Cognito App Client
- Full Structure of Lambda@Edge event data types
- Great UML diagram for using GSuite auth via Cognito on frontends
- Auth0 protection for frontends (not with Cognito, but a similar design)
- AWS Amplify library for Cognito tokens
- How to generate responses in Lambda@Edge functions
- Setting cookies on Viewer-Request Lambda@Edge functions
- Cookie domains and subdomain access
- AWS Listener rules in Terraform
- Fantastic typescript Lambda@Edge function for authenticating Cognito. (I wish I’d found this resource first!)
- Similarish design, but with CloudFormation


By David Mattia